We get it image optimization isn’t exactly the sexiest part of building your website. But if you’re using WordPress and want your site to load fast, rank well on Google, and not frustrate your visitors? Then optimizing your images is something you really can’t skip.
The good news? It’s not that complicated once you know what to look for. And if you’d rather not deal with it at all we’ve got you covered. But first, let’s break down the basics.
Why Image Optimization Even Matters
You’ve probably heard the phrase, “a picture is worth a thousand words,” but in web terms, a poorly optimized picture is worth… a thousand reasons your site is slow.
When images are too big or not formatted properly, they drag down your load time. And in 2025, people don’t wait around for slow sites. Google doesn’t either it takes speed and performance into account when ranking websites.
So yeah, this stuff matters.
Step-by-Step: How to Optimize Images in WordPress
1. Resize Before You Upload
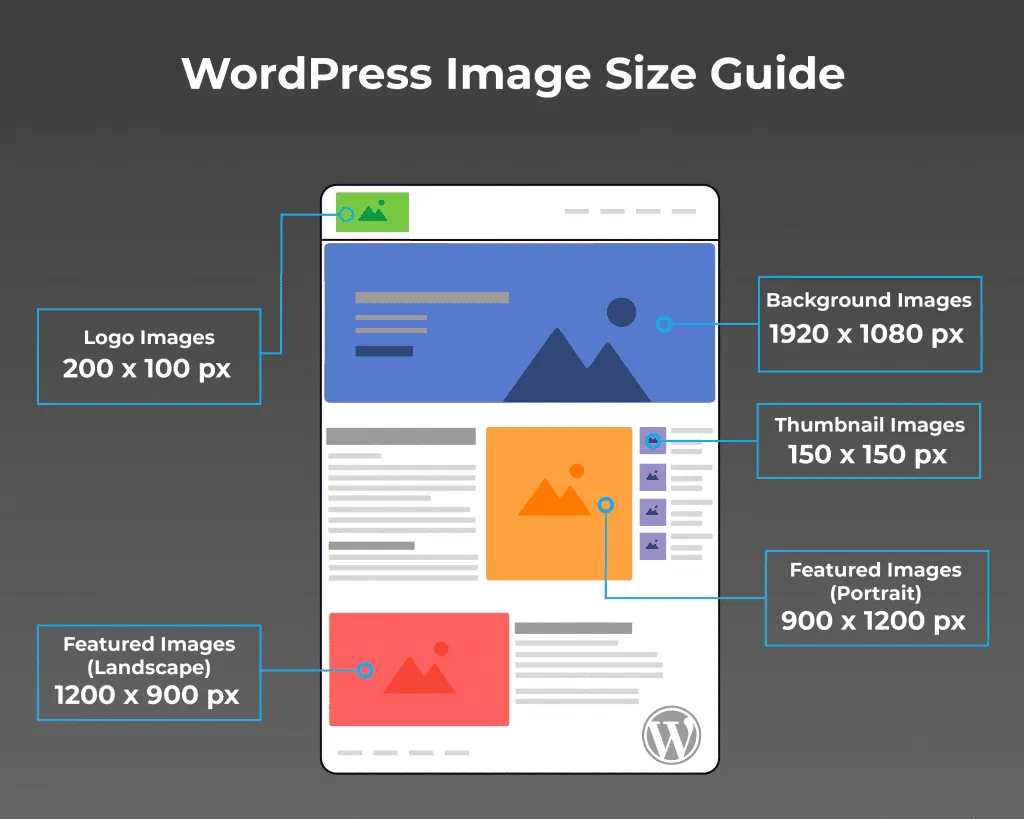
Don’t upload a 4000×3000 image if it’s only going to display at 800×600 on your site. Use a tool like Photoshop, Canva, or even your computer’s built-in editor to resize your image before uploading it to WordPress.
Ideal width for most blog images? Around 1200px or less.
2. Compress the File Size
Large file size = slow loading time. Use free tools like TinyPNG or ImageOptim to compress images without sacrificing quality.
You’ll be amazed how much smaller your images can be with no visible difference.
3. Use the Right File Format
- JPG is best for photos and colorful images.
- PNG is good for images with transparency.
- WebP is even better it’s newer, super efficient, and supported by most modern browsers.
WordPress now supports WebP by default, and some plugins (like ShortPixel or Imagify) can even convert your images automatically.
4. Rename Your Image Files (Yes, Seriously)
Instead of uploading a file named IMG_4382.jpg, rename it to something descriptive like custom-wood-dining-table.jpg. Google actually looks at file names, and this helps with SEO.
5. Fill Out the Alt Text
Alt text isn’t just for accessibility it’s another chance to give Google context. Plus, if your image can’t load for some reason, this is the text people will see.
Just describe what’s in the image in plain, natural language. Example: “Modern black leather office chair next to window.”
6. Use a Plugin (If You Want to Automate It)
There are some great WordPress plugins that can make image optimization almost hands-off:
- Smush
- ShortPixel
- Imagify
- EWWW Image Optimizer
They’ll compress, resize, and even convert images to WebP in the background.
Sounds Like a Lot? Let E6Media Handle It for You
If reading all this has you thinking, “This feels like more than I want to deal with,” you’re not alone.
At E6Media, we help businesses keep their websites fast, clean, and optimized without making you spend hours Googling things like “lossless compression” or “WebP fallback.” Whether you need a full site audit or just want someone to go in and clean up your media library, we’re here to help.
Let us handle the behind-the-scenes work, so you can focus on the part of your business you actually enjoy.
Final Thought
Image optimization might be one of the less glamorous parts of running a WordPress site, but it’s one of the most important. A few small tweaks can make a big difference in how your site performs and how people experience your brand.
If you want to take care of it yourself, now you know how. And if you’d rather have it done right without lifting a finger? E6Media’s got your back